


Undoubtedly, as a successful Shopify store owner, you're sending a generous amount of emails to your customers every day. But have you ever thought about how many of these emails are actually landing in the primary inbox rather than the spam folder? Or what's securing your emails from potential fraud or spoofing attacks threatening to mar your brand’s reputation? That’s where configuring DKIM for Shopify comes into play.
DKIM (DomainKeys Identified Mail) is a critical email security protocol that cryptographically signs your outgoing emails, ascertaining their legitimacy. In simple terms, it's like pulling up a VIP pass so your emails don't get pushed aside by receiving servers as potential threats. Next up you may wonder, how does this relate to your Shopify store? Well, your Shopify store’s email deliverability is directly influenced by how effectively you've configured DKIM.
Building a successful Shopify store goes beyond creating visually appealing products and crafting stellar marketing strategies. A significant portion of your success lies in your ability to establish trusted communication channels with your customers. The good news is, we at First Pier are here to help you navigate the intricacies of Shopify DKIM setup, from verifying your domain to ensuring a syntactically correct DKIM record. Stay tuned as we dive deeper into the how-to’s of setting up Shopify DKIM right, ensuring that your emails make their way to your customers' primary inbox while preserving your brand's integrity.
Understanding DKIM and SPF
Before we delve into setting up Shopify DKIM, understand what DKIM (DomainKeys Identified Mail) and SPF (Sender Policy Framework) are and their roles in email security.
Explanation of DKIM (DomainKeys Identified Mail)
DKIM is an email authentication method that helps protect against email spoofing or impersonation. Essentially, it provides an encryption key and digital signature that verifies that an email message has not been forged or altered during transit. It's like a digital seal of authenticity that proves to your recipients that the email genuinely came from your domain and hasn't been tampered with along the way.
A DKIM signature is added to the header of your outgoing emails. The receiving server then uses the public key published in your DNS to verify the signature and check the integrity of the message.
Explanation of SPF (Sender Policy Framework)
SPF, on the other hand, is an email validation protocol designed to prevent email spoofing. It allows the recipient's mail server to check that incoming mail from your domain comes from a host authorized by your domain's administrators. In layman's terms, SPF is like a VIP list of servers authorized to send emails on your behalf.
When you send an email, the receiving mail server checks your SPF record to ensure the email came from a server you've authorized. If the check fails, the email might be marked as spam or rejected outright.
The Role of DKIM and SPF in Email Security
DKIM and SPF form the backbone of email authentication and play a critical role in ensuring that your emails are trustworthy and less likely to be flagged as spam. They work hand in hand to protect your brand reputation, enhance email deliverability, and safeguard against phishing and spoofing attacks.
DKIM ensures the integrity of the message content, while SPF validates the envelope sender address that is used during the delivery of the email. By implementing both DKIM and SPF, you add an extra layer of credibility to your emails, making it more likely that your messages will land in your recipient's primary inbox, not their spam folder.
At First Pier, we understand the importance of these email authentication protocols. That's why we're committed to guiding Shopify store owners like you through the process of setting up Shopify DKIM and SPF correctly. In the following sections, we'll walk you through the steps of adding these records to your domain's DNS and testing your configuration to ensure everything is working as expected.
Setting Up Your Domain on Shopify
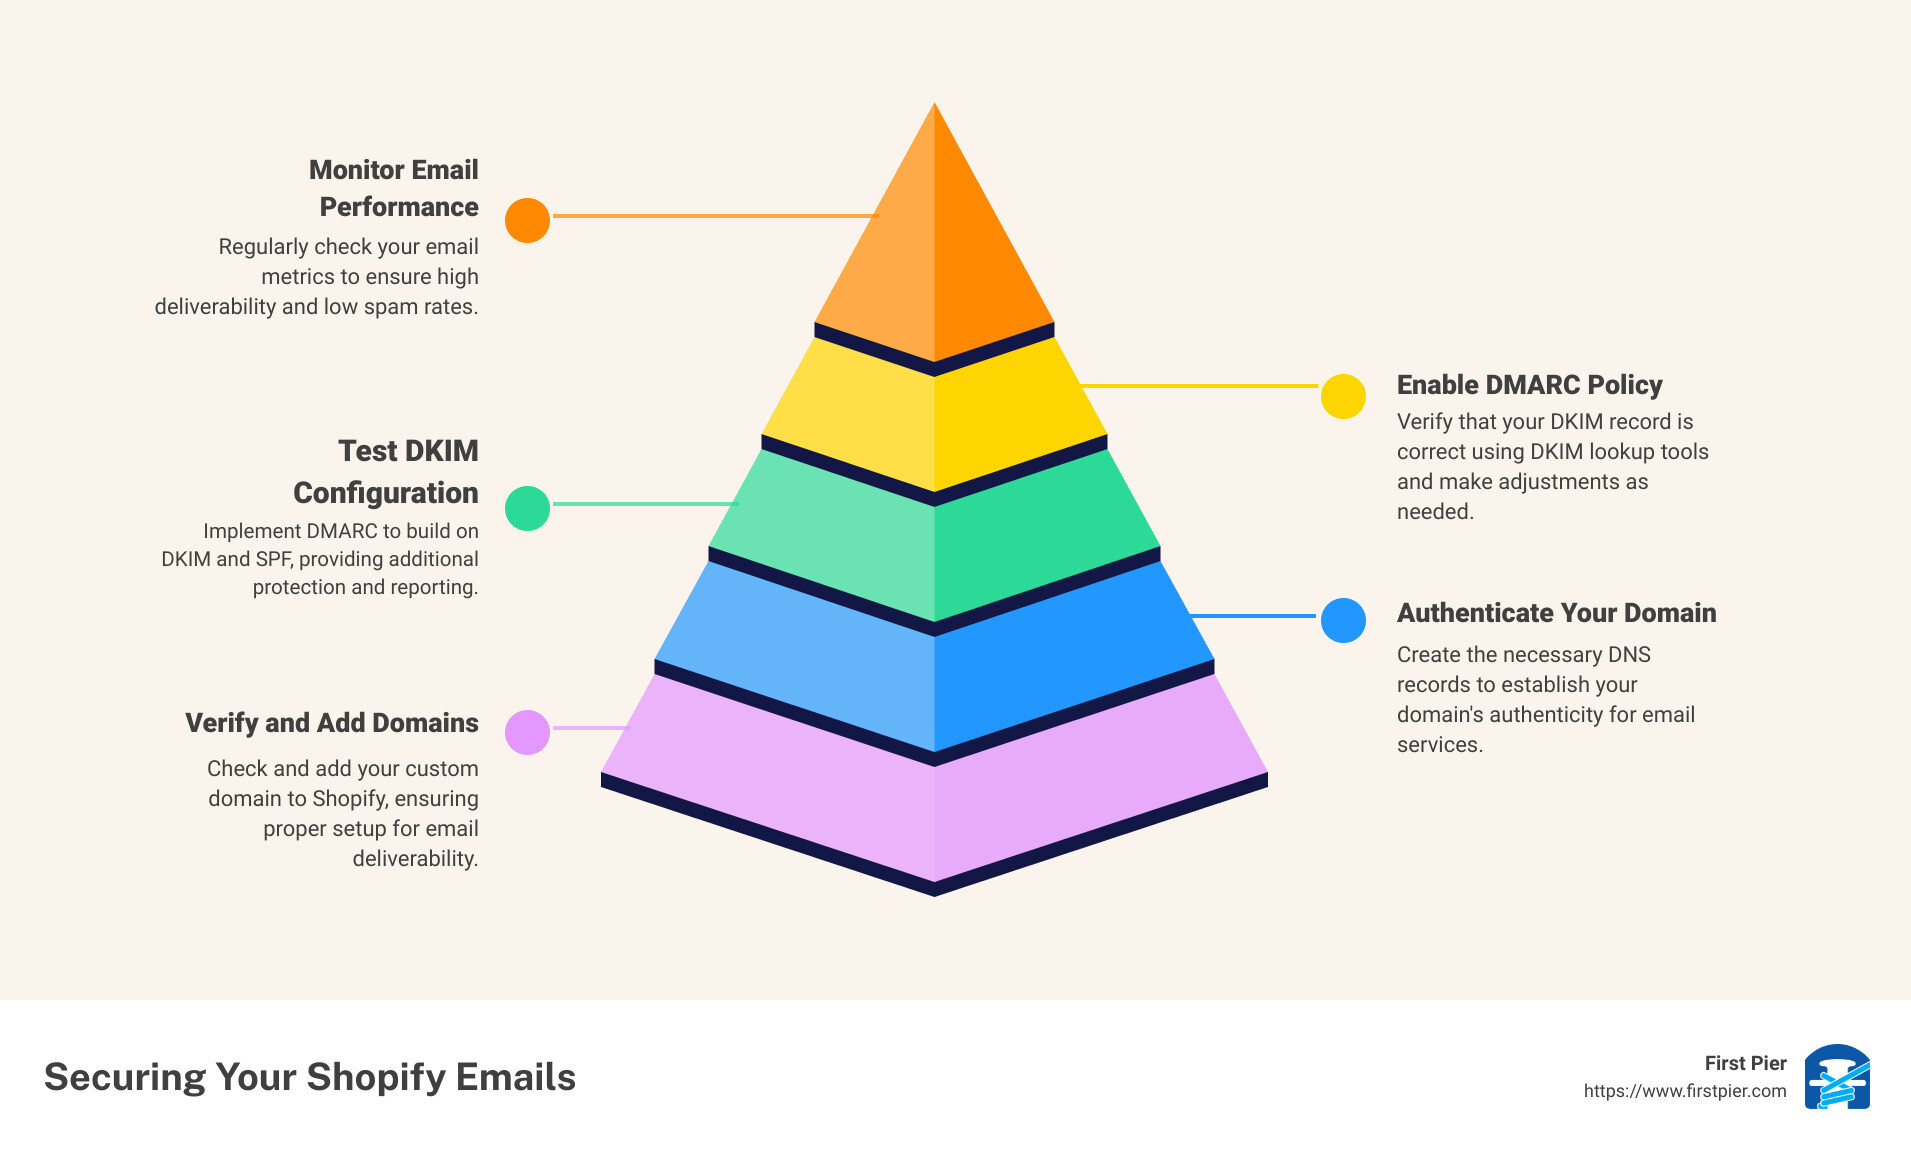
Before we delve into setting up Shopify DKIM, it's crucial to ensure that your domain is correctly set up on Shopify. This involves verifying your domain and possibly adding a custom domain if it's not already added.
Checking Your Domains on Shopify
Start by logging into your Shopify account and checking the status of your domains. If a domain is already added to Shopify, you’ll be able to spot a “Connected” status against it. In case it's not, you'll need to add a custom domain.
Adding a Custom Domain to Shopify
Adding a custom domain to your Shopify store adds an extra layer of professionalism and makes it easier for customers to find you online. To do this, you can follow the steps outlined in Shopify's knowledge base. The process is simple and straightforward, and we at First Pier are always here to assist if you encounter any hurdles along the way.
Verifying the Custom Domain on Shopify
After you have successfully added your custom domain, you need to verify it. Shopify will send you a confirmation message once your domain is verified. If the domain verification fails, ensure that the DNS records you entered into your third-party domain provider match the records that were provided in your Shopify admin.
Verifying your domain is an essential preliminary step before setting up your Shopify DKIM. It ensures that you're the owner of the domain, thus increasing the trust of email servers and improving the deliverability of your emails.
In the next section, we'll guide you through the process of setting up DKIM for Shopify. We're just a click away if you need any assistance. Our expert, Steve Pogson, has extensive experience in Shopify DKIM setup and is ready to help you optimize your Shopify store’s performance.

Setting Up DKIM for Shopify
Setting up Shopify DKIM is a straightforward process, but it involves a few key steps. Let's walk through them one by one.
Navigating to the Sender Email Page in Shopify Admin Console
First, log in to your Shopify account as an admin. Once you're in, navigate to the Sender email page on the portal. This page is the control center for your email settings, where you'll be able to start the DKIM setup process.
Authenticating Your Domain
On the Sender email page, you'll see an option to "Authenticate." Clicking on this will start the process of verifying your domain. This step is crucial because it ensures that your emails are sent from an authenticated domain, reducing the risk of your emails ending up in customers' spam folders.
Creating Four New Records with Your Domain Provider
After clicking on Authenticate, you'll be redirected to a new tab with instructions to publish four "CNAME" records in your domain’s DNS. These records are essential for enabling DKIM for Shopify.
To do this, visit your DNS provider’s management console and follow the instructions to publish these records in the correct section. If you're unsure about this step, don't hesitate to reach out to our expert, Steve Pogson, who can provide additional guidance.
Waiting for DNS Changes to Process (24-48 hours)
Once you've saved the changes, it will take your DNS 24-48 hours to process the changes. During this time, it's important to be patient and not make any additional changes to your DNS settings. You've done the hard work - now it's time to let the technology do its job!
And that's it - you've successfully set up Shopify DKIM for your custom domain. This crucial step will help improve your email deliverability and protect your brand reputation. But remember, setting up DKIM is just one part of the equation. In the next section, we'll show you how to test your DKIM configuration to make sure everything is working as expected.
Testing Your DKIM Configuration
Once you've set up your Shopify DKIM, test your configuration. This is a critical step in ensuring your emails get delivered correctly and securely. To do this, you'll need a DKIM lookup tool and a free OnDMARC account.
Using a DKIM Lookup Tool to Verify Your DKIM Record
A DKIM lookup tool can help you confirm that your DKIM records have been set up correctly on Shopify. This tool checks the syntax and validity of your DKIM record. To use it, simply enter your domain name and the selector (kl or kl2). If the DKIM status turns green, it signifies that your DKIM record is correctly configured.
You can use EasyDMARC's DKIM Record Generator or a similar tool. These tools are designed to help you validate your DKIM setup and confirm that your emails are coming from an authorized server and have not been tampered with during delivery.
Creating a Free OnDMARC Account to Test Your Configuration
The next step is to create a free OnDMARC account. OnDMARC is a tool that provides you with a detailed analysis of your email performance. It will help you understand how your emails are performing in terms of deliverability and security.
To create a free account, visit OnDMARC and follow the prompts. Once your account is set up, you can start monitoring your email performance and make necessary adjustments to improve your email deliverability.
Setting up Shopify DKIM is not a one-time task. It's a process that requires regular monitoring and tweaking to ensure optimal performance. With a properly configured and monitored DKIM, you can help ensure that your emails reach your customers' inboxes securely and reliably.
In the next section, we'll cover some common issues you may encounter during the DKIM setup process and how to resolve them. We at First Pier are always here to guide you through these complex processes.
Resolving Common DKIM Setup Issues
When setting up your shopify dkim, you might encounter certain challenges, but don't worry. We at First Pier have your back. We will help you understand these issues and provide clear, simple solutions for them.
Understanding the "Value is too long" Error
One common issue you might encounter when setting up your DKIM is the "value is too long" error. This typically happens when the TXT record value you are trying to add in the DNS settings exceeds the maximum character limit allowed by Shopify. The error message might seem daunting, but it's not as complex as it appears. It simply means that the DKIM record generated by Google is too long for Shopify's domain DNS settings.
Generating a New DKIM Record in 1024 bit
To resolve this issue, you'll need to generate a new DKIM record. When Google prompts you to generate a new DKIM record, it will ask you to choose between 1024 or 2048 bit. Choose the 1024 bit option. Shopify has no issue accepting the new TXT record when it's in 1024 bit. Once you've done this, your email should authenticate in your Google workspace without any trouble.
Addressing Concerns About Shopify's Support for 2048 bit DKIM Records
You might be wondering, "Why can't I use a 2048 bit DKIM record?" The reality is that Shopify currently does not support 2048 bit DKIM records. While 2048 bit records offer increased security, Shopify's system is not yet equipped to handle their length.
However, it is worth noting that using a 1024 bit DKIM record still provides a significant level of security and should not deter you from setting up your DKIM. It's a crucial step in improving your email deliverability, enhancing your email security, and maintaining your brand's reputation.
At First Pier, we understand the importance of staying on top of evolving security standards and are always monitoring updates from Shopify regarding support for 2048 bit DKIM records.
Setting up your DKIM is a crucial step to ensuring your emails are successfully delivered. If you face any issues or need further clarification, reach out to us at First Pier. We are always ready to help.
In the next section, we will look into enhancing your email security even further using DMARC.
Enhancing Your Email Security with DMARC
Great, you've set up your Shopify DKIM and are on your way to securing your email communications, but there's another critical layer to email security - DMARC or Domain-based Message Authentication, Reporting & Conformance.
Explanation of DMARC (Domain-based Message Authentication, Reporting & Conformance)
DMARC is an email security protocol that builds on DKIM and SPF (Sender Policy Framework). It provides a robust system to prevent email spoofing, ensuring that every email sent from your domain is genuinely from you and not an imposter trying to harm your reputation or scam your customers.
In a nutshell, when an email is sent, the recipient's server checks the DMARC DNS record of the sender's domain to verify its authenticity. If the check fails, the email is either rejected or quarantined, based on the DMARC policy set by the sender. This ensures that only emails from verified sources reach your customer's inbox.
Enabling DMARC for Your Domains
Now that we know what DMARC is, let's talk about how to implement it for your Shopify store.
- Create Your DMARC Record: This is a text string that includes your policy and the email addresses for aggregate and forensic reports. A basic DMARC record might look like this: v=DMARC1; p=none; rua=mailto:reports@yourdomain.com.
- Add the DMARC Record to Your DNS: Log in to your DNS provider and create a new TXT record. The record's name should be _dmarc.yourdomain.com, and the value is the DMARC record you created above.
- Save your changes
The process may seem technical, but with careful attention to detail, you can add an extra layer of security to your email communications.
Using a DMARC Analyzer to Monitor Email Performance
After implementing DMARC, it's crucial to keep an eye on your email performance. That's where a DMARC analyzer comes in handy.
This tool will provide you with reports on how your emails are performing, ensuring that your emails are reaching your customers' inboxes without being flagged as spam. Monitoring your DMARC policy and making necessary adjustments based on the data you collect is an essential part of maintaining email security.
At First Pier, we understand the complexities of setting up and managing email security protocols like Shopify DKIM and DMARC. That's why we're here to guide you through every step of the process. If you encounter any issues or have any questions, don't hesitate to reach out to us. We're here to ensure your Shopify store's email communications are as secure and effective as possible.
Conclusion
Recap of the Importance of DKIM and SPF for Shopify
We've now covered the essentials of setting up Shopify DKIM and SPF records, two critical components of your email security framework. As we've seen, these measures help authenticate your emails, ensuring they are recognized as legitimate and trustworthy by recipients' email servers. This is crucial in protecting your brand reputation, ensuring your emails reach your customers' inboxes, and, ultimately, optimizing the success of your email marketing efforts.
Just like Steve Pogson, our expert at First Pier, often emphasizes, "Email authentication isn't just a technical necessity—it's a cornerstone of your brand's digital identity and a key driver of your ecommerce success."
While the setup process may seem complex, the rewards of proper Shopify DKIM and SPF configuration are invaluable. And remember, you're not in this alone. Our team at First Pier is always ready to assist you in navigating these technical steps, just as we're committed to helping you optimize every other aspect of your Shopify store.
Encouragement for Continuous Monitoring and Optimization of Email Security
But the journey doesn't stop at setup. It's crucial to continuously monitor your email security measures and make necessary adjustments as you grow and evolve. Tools like OnDMARC can prove invaluable in testing and verifying your configurations.
Remember that your email marketing strategy is an investment in your ecommerce success. By taking the time to set up Shopify DKIM and SPF records properly, you're laying a solid foundation for robust, secure, and effective email communications.
For further insight on optimizing your Shopify store, be sure to explore our comprehensive guides on topics like Shopify Email Marketing and Shopify Ecommerce Best Practices.

In conclusion, securing your Shopify store's emails should be a priority. As we've seen, it might appear complicated, but it's integral to your ecommerce success. So, don't hesitate to start working on your Shopify DKIM and SPF records today. We're here to support you every step of the way.
Stay secure and keep flourishing in your ecommerce journey!


.png)
.png)

